The Christkind's - Building a Custom Bot for MS Teams with VSCode

Story
After witnessing how the newly implemented knowledge-sharing bot significantly improved access to information for everyone in the workshop, the Christkind turned its attention to another pressing challenge: managing storage in the warehouse. While the Warehouse Management System (WMS) provided clarity about inventory levels and item locations, access was limited to only a few elves, and the system itself was confined to a Windows environment.
The Christkind understood that to enhance visibility and efficiency across the workshop, it needed a solution that was accessible to all. Inspired by the success of the knowledge bot, it decided to create a Teams bot specifically designed to provide real-time updates about storage and inventory.
Planning the Storage Management Bot
The Christkind began by identifying the key functionalities of the bot. It needed to provide real-time information on inventory levels, allow elves to request updates on specific items, and notify the team of low stock levels or upcoming orders.
Choosing the Right Framework:
- Considering the existing WMS was running on Windows, the Christkind decided to use Pro Code to develop the Teams bot. This choice provided greater control and customization, ensuring seamless integration with the warehouse system.
Connecting to the Warehouse Management System:
- The Christkind worked on establishing a connection between the Teams bot and the WMS. This integration was crucial for the bot to fetch real-time data on storage and inventory.
Developing the Bot Logic:
- The Christkind wrote the logic for the bot using a programming language suitable for bot development. The bot needed to handle various commands such as:
- “Check inventory for item X.”
- “What’s the stock level of product Y?”
- “Alert me when item Z goes below a certain threshold.”
Creating User-Friendly Interactions:
- To ensure that the bot was easy to use, the Christkind focused on designing intuitive interactions. It incorporated buttons and quick replies, allowing elves to easily navigate the bot’s functionalities.
Testing and Iteration:
- Before rolling out the bot to the entire workshop, the Christkind conducted thorough testing. It gathered feedback from a small group of elves to identify any issues and to refine the bot’s performance.
Deploying the Teams Bot:
- Once testing was complete, the Christkind deployed the Teams bot within the Microsoft Teams environment. This made it accessible to all elves, empowering them to manage storage more effectively.
A Transformative Solution
With the new Teams bot live, the Christkind observed a remarkable transformation in how the workshop managed its inventory. Elves no longer had to rely on a limited number of colleagues for storage information; they could simply ask the bot for updates at any time.
“Hey, bot! What’s the current stock of candy canes?” one elf would inquire, and just seconds later, the bot would respond with the latest data.
The integration of the storage management bot not only streamlined operations but also fostered a sense of ownership among all elves. They felt empowered to take initiative in inventory management, ensuring that supplies were always available when needed.
As the holiday season approached, the Christkind felt proud of the advancements made in the workshop. With knowledge and inventory at their fingertips, the elves were more prepared than ever to make every child’s Christmas wish a reality.
Implementation with Teams Toolkit Message Extention
Setting Up
To get started, the Christkind made sure all the tools and materials were ready:
- Install Node.js: The Christkind checked that Node.js was installed on the coding machines.
- Install Teams Toolkit: With a quick spell (and a download), the Teams Toolkit was installed in Visual Studio Code.
- Create a New Project:
- Open Visual Studio Code.
- Use the Teams Toolkit to create a new project.
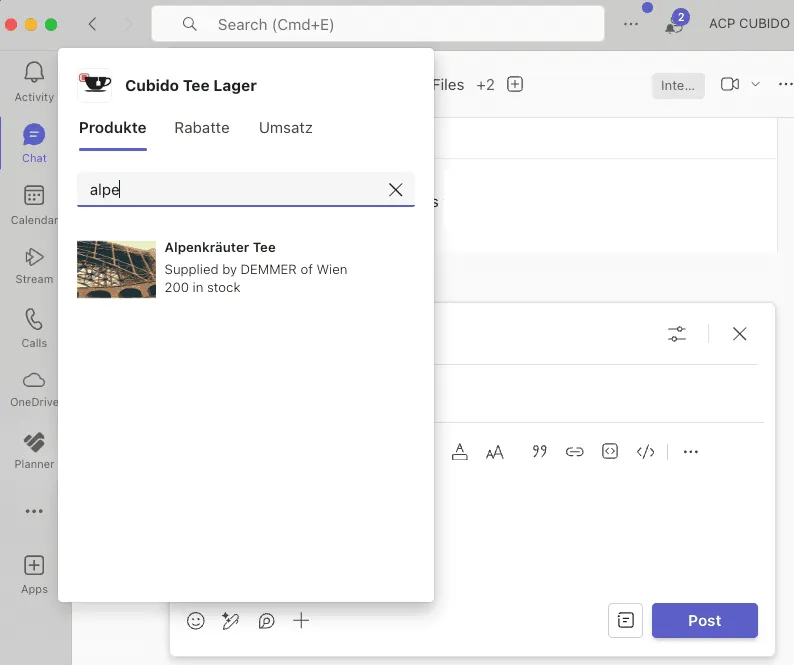
- Choose the “Message Extension” template. This ensured that the elves would be able to search and interact with inventory data directly from Microsoft Teams messages and Copilot. !(Teams Toolkit Create Message Extension)[./TTK_Create.png]
Project Structure
After setting up the project, the Christkind examined the directory. It looked something like this:
magic-inventory-bot/
├── src/
│   ├── bot/
│   │   └── messageExtension.js
│   ├── config/
│   │   └── appSettings.json
│   ├── index.js
│   └── ...
└── package.json
The focus was on messageExtension.js, where the real magic would happen.
Adding Inventory Logic
In the src/bot/messageExtension.js file, the Christkind implemented commands to interact with the WMS:
const { TeamsActivityHandler, MessageExtensionHandler } = require('botbuilder');

class MessageExtensionBot extends TeamsActivityHandler {
    constructor() {
        super();
    }
}

class InventoryMessageExtension extends MessageExtensionHandler {
    async handleTeamsMessagingExtensionQuery(context, query) {
        const searchTerm = query.parameters[0]?.value || '';
        const inventory = await this.searchInventory(searchTerm);

        const attachments = inventory.map(item => ({
            contentType: 'application/vnd.microsoft.card.adaptive',
            content: {
                type: 'AdaptiveCard',
                version: '1.3',
                body: [
                    {
                        type: 'TextBlock',
                        text: `Item: ${item.item}`,
                        weight: 'Bolder',
                        size: 'Medium',
                    },
                    {
                        type: 'TextBlock',
                        text: `Quantity: ${item.quantity}`,
                    },
                ],
                actions: [
                    {
                        type: 'Action.Submit',
                        title: 'Request More Info',
                        data: { action: 'requestMoreInfo', item: item.item },
                    },
                ],
            },
        }));

        return {
            composeExtension: {
                type: 'result',
                attachmentLayout: 'list',
                attachments: attachments,
            },
        };
    }

    async searchInventory(searchTerm) {
        // Simulate a WMS lookup
        const inventory = [
            { item: 'Candy Canes', quantity: 100 },
            { item: 'Gingerbread', quantity: 50 },
            { item: 'Christmas Ornaments', quantity: 200 },
        ];

        if (searchTerm) {
            return inventory.filter(item =>
                item.item.toLowerCase().includes(searchTerm.toLowerCase())
            );
        }
        return inventory;
    }
}

module.exports.MessageExtensionBot = MessageExtensionBot;
module.exports.InventoryMessageExtension = InventoryMessageExtension;
Configuring the Magic
In src/config/appSettings.json, the Christkind set up the bot’s connection to Microsoft Teams and Azure:
{
    "MicrosoftAppId": "<YOUR_APP_ID>",
    "MicrosoftAppPassword": "<YOUR_APP_PASSWORD>",
    "MessagingEndpoint": "<YOUR_ENDPOINT>/api/messages"
}
The Christkind carefully replaced <YOUR_APP_ID> and <YOUR_APP_PASSWORD> with the bot’s Azure credentials.
Testing the Message Extension
With the setup complete, the Christkind tested the bot locally:
Run Locally: (F5) The Christkind used the Teams Toolkit’s “Run Locally” option to test the bot.
Add to Teams: Add Environment and Deploy it
Deploying the Bot
When ready, the Christkind followed these steps to deploy the bot:
Publish to Azure: Use the Teams Toolkit to deploy the bot to Azure Bot Services.
Update Teams Manifest: Update the manifest file with the bot’s new endpoint and re-upload it to Teams.
A Magical Result
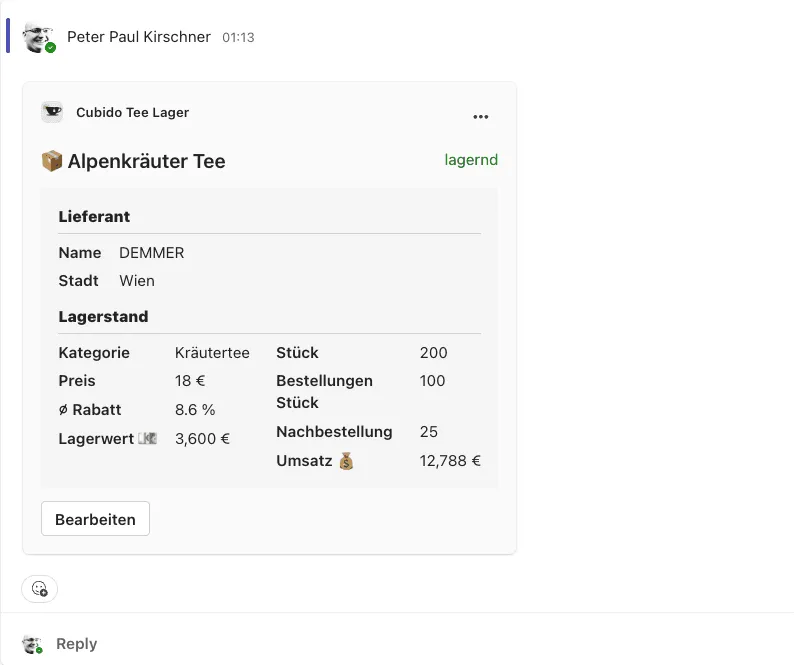
With the bot live, the elves could now interact with the warehouse inventory directly from Microsoft Teams. By using the message extension, they could:
- Search for items in the WMS by typing keywords.
- View quantities and other details in beautifully designed Adaptive Cards.
- Request additional information with a single click.
Remark
The Teams Toolkit takes a lot of work off the developer’s plate, simplifying setup and integration, as long as you have access to use it.
Links
- 1: The Challenge of the Letters
- 2: The Christkind’s Data Transformation - Transforming Letters into Forms
- 3: The Christkind’s Magical Email Solution
- 4: The Christkind’s Magical PWA - Transforming Children’s Letters into Digital Art
- 5: The Christkind’s Ingenious Snail Mail Solution - Bringing Letters to Life
- 6: The Christkind’s Ingenious Snail Mail Solution - Embracing the Flow
- 7: The Christkind’s Ingenious Snail Mail Solution - To the next level
- 8: The Christkind’s - Deployment Dilemma
- 9: The Christkind’s - Spreading the Christmas Spirit
- 10: The Christkind’s - Upgrading the Production Line PowerApps
- 11: The Christkind’s - Upgrading the Production Line Excel
- 12: The Christkind’s - The Christkind’s - Documenting the Christkind’s Journey
- 13 - The Christkind’s - The preparation for the call with Santa
- 14 - The Christkind’s - The Meeting with Santa
- 15 - The Christkind’s - Enhancing Knowledge Access with Graph Connectors
- 16 - The Christkind’s - Fine-Tuning the Graph Connector for Better Copilot Answers
- 17 - The Christkind’s - Building a Custom Agent with Copilot Studio