The Christkind's - Enhancing Knowledge Access with Graph Connectors
Story
After the productive meeting with Santa, the Christkind realized that addressing the challenges of sourcing detailed information for specialized parts required a more streamlined approach. The suggestions from Santa were spot on; the Christkind, too, struggled with finding precise data within the vast expanse of documents and notes accumulated over the years. The answer lay in integrating Microsoft Graph Connectors to connect external knowledge sources, particularly a wiki containing construction plans and descriptions.
The Christkind had always envisioned a system that could easily pull in critical information from various repositories, and this was the perfect opportunity to bring that vision to life. With the power of Microsoft Graph, it could connect to the wiki, enabling the elves to access the necessary construction plans and detailed descriptions of uncommon parts directly within their workflow.
Implementation Steps for the Graph Connector
Identify the External Data Source
- The Christkind pinpointed the wiki as the primary data source, which housed valuable information on manufacturing processes and part specifications.
Configure the Graph Connector
- With guidance from the elves, the Christkind set up the Graph Connector to establish a secure connection to the wiki. This involved defining the API endpoints and ensuring that the data structure matched the needs of the production team.
Index the Data
- Once the connector was configured, the Christkind initiated a data indexing process to ensure that the relevant articles and documents from the wiki were searchable. This included construction plans and explanations for specialized parts.
Create a Search Experience
- To make access easy for the elves, the Christkind collaborated with the IT team to develop a user-friendly interface within Microsoft Teams. This interface would allow the elves to query the wiki directly for information while working on their tasks.
Testing
- The Christkind conducted testing sessions with the elves to gather feedback on the functionality of the Graph Connector. This was essential to ensure that the search results were relevant and the integration truly met their needs.
Excitement in the Workshop
As the integration came to life, the Christkind felt a renewed sense of excitement in the workshop. The elves no longer had to dig through stacks of paper or scroll endlessly through digital documents to find critical information. Instead, they could now simply type their queries and access the needed plans and specifications instantly.
With the knowledge of specialized parts at their fingertips, the elves felt empowered to enhance their production processes. They could now craft and order the right components efficiently, ensuring that no child’s wish would go unfulfilled.
The Christkind watched with pride as the workshop buzzed with activity, knowing that it had taken a significant step forward in creating a more connected and informed environment for everyone. The holiday season was shaping up to be the most efficient yet!
Implementation of the Graph Connector
Starting with a simple C# Console Application for the first try is enough to get things moving.
- Create a new C# Console Application project in Visual Studio.
- Add the necessary NuGet packages for Microsoft Graph and authentication.
The data source for this implementation consists of simple HTML files that contain the necessary information.
<html>
   <head>
      <title>Wiki Document1</title>
   </head>
   <body>
      <h1>Wiki Document1</h1>
      <p>Summary of the Document</p>
      <h2>Material</h2>
      <p>
         ...
      </p>
      <h2>Preperation</h2>
      <p>
      ...
      </p>
      ...
   </body>
</html>
Configure Authentication
Go to the Entra Portal and register a new application. This involves setting up the necessary permissions and configuring either a certificate or a client secret for authentication. While using a certificate is generally more secure, a client secret can also be used for simplicity.
Here are the steps to register the application:
- Navigate to the Entra Portal: Open the Entra Portal and go to the “App registrations” section.
- Register a New Application: Click on “New registration” and fill in the required details.
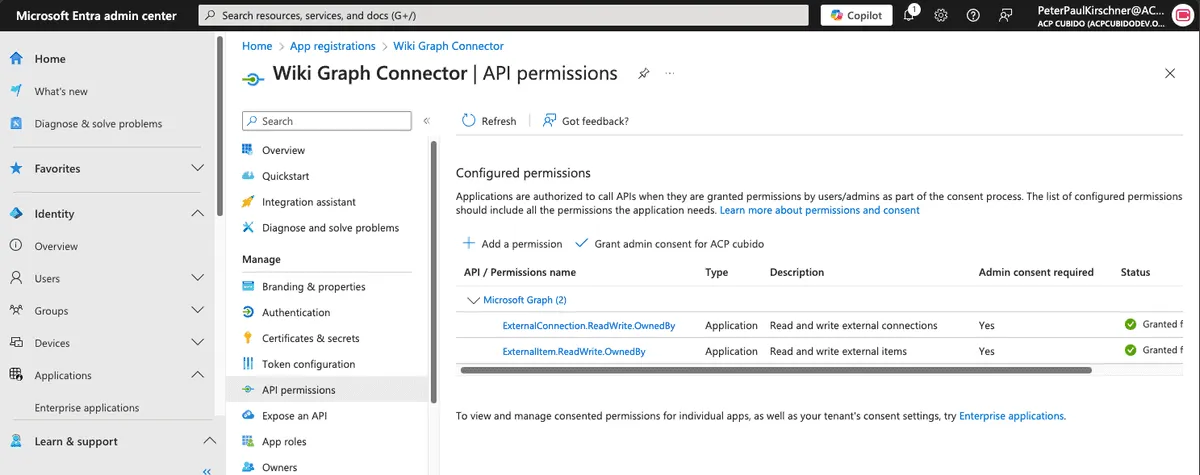
- Configure API Permissions (Application): After registering the application, go to the “API permissions” section and add the necessary Microsoft Graph permissions. Ensure you include permissions like
ExternalConnection.ReadWrite.OwnedByandExternalItem.ReadWrite.OwnedBy. This is enough currently for this use case. - Set Up Authentication:
- Certificate: If you choose to use a certificate, upload the certificate in the “Certificates & secrets” section.
- Client Secret: If you prefer to use a client secret, generate a new client secret in the “Certificates & secrets” section and note it down as it will be used in your application.
Here is a screenshot showing the permissions configuration:
Connect to Microsoft Graph in C#
      // Initialize the Graph client
      var clientId = "YOUR_CLIENT_ID";
      var tenantId = "YOUR_TENANT_ID";
      var clientSecret = "YOUR_CLIENT_SECRET";

      IConfidentialClientApplication confidentialClientApplication = ConfidentialClientApplicationBuilder
         .Create(clientId)
         .WithTenantId(tenantId)
         .WithClientSecret(clientSecret)
         .Build();

      ClientCredentialProvider authProvider = new ClientCredentialProvider(confidentialClientApplication);
      GraphServiceClient graphClient = new GraphServiceClient(authProvider);
Connect, and Define the Schema
 Console.WriteLine("Check if External Connection exists");
        if (await CheckConnection(connectionSettings))
        {
            Console.WriteLine("External Connection exists");
        }
        else
        {
            ExternalConnection connection = await CreateConnection(connectionSettings);
            if (connection == null)
            {
                Console.WriteLine("External Connection not created");
                return;
            }
            await RegisterSchemaAsync(connection);
            Console.WriteLine("External Connection created and Schema created");
        }
        Console.WriteLine("Get HTML Files");
Register the External Connection in Graph
 var newConnection = new ExternalConnection
{
      Id = connectionSettings.Id,
      Name = connectionSettings.Name,
      Description = connectionSettings.Description,
};

return await graphClient.External.Connections.PostAsync(newConnection);
The Basic Structure of an External Item Schema for Graph
 var schema = new Schema
{
      BaseType = "microsoft.graph.externalItem",
      Properties = new List<Property>
{

      new Property { Name = "name", Type = PropertyType.String, IsQueryable = true, IsSearchable = true, IsRetrievable = true, IsRefinable = false, Labels = new List<Label?>() { Label.Title }},
      new Property { Name = "description", Type = PropertyType.String, IsQueryable = false, IsSearchable = true, IsRetrievable = true, IsRefinable = false },
      new Property { Name = "filename", Type = PropertyType.String, IsQueryable = false, IsSearchable = true, IsRetrievable = true, IsRefinable = false,Labels=new List<Label?>(){Label.FileName } },
      new Property { Name = "fileExtension", Type = PropertyType.String, IsQueryable = false, IsSearchable = true, IsRetrievable = true, IsRefinable = false,Labels=new List<Label?>(){Label.FileExtension } },
      new Property { Name = "url", Type = PropertyType.String, IsQueryable = false, IsSearchable = true, IsRetrievable = true, IsRefinable = false,Labels=new List<Label?>(){Label.Url } },
      new Property { Name = "iconUrl", Type = PropertyType.String, IsQueryable = false, IsSearchable = true, IsRetrievable = true, IsRefinable = false,Labels=new List<Label?>(){Label.IconUrl } },

},
};

await GraphHelper.RegisterSchemaAsync(currentConnection.Id, schema);
Read HTML Files and Extract the Informations
here is the Code Block
  List<ResponsePage> items = new List<ResponsePage>();
   Directory.EnumerateFiles("../../../../../html", "1_*.html").OrderBy(f => f).ToList()
   .ForEach((fileName) =>
   {
      Console.WriteLine($"Process {fileName}");
      Console.WriteLine("Load HTML (Extract)");
      var fileContent = File.ReadAllText(fileName);
      Console.WriteLine("Load HTML (Transform)");
      ResponsePage value = ExtractHTML.ExtractHTML(fileContent);
      value.Key = ExtractHTML.GetHash(fileName);
      var info=new FileInfo(fileName);
      value.CreatedDateTime=info.CreationTimeUtc;
      value.FileName=info.Name;
      value.FileExtension=info.Extension;
      value.Url = $"https://mysecureurl.cubido.at/{fileName}";
      items.Add(value);
   });
Create External Items and Upload it
This is the minimal Graph Item with an ACL that grants access to everyone.
To modify the grant access take a look to the ACL section to a specific user or group.
var extItem = new ExternalItem
   {
         Id = item.Key,
         Content = new ExternalItemContent
         {
            Type = ExternalItemContentType.Html,
            Value = item.HTML
         },
         Acl = new List<Acl>
   {
         new Acl
         {
            AccessType = AccessType.Grant,
            Type = AclType.Everyone,
            Value = "everyone"//settings.TenantId,
            /*
               Type = AclType.User, Value = UserGuid
               Type = AclType.Group, Value = GroupGuid
            */
         }
   },
         Properties = new Properties
         {
            AdditionalData = new Dictionary<string, object>
         {
            { "name", item.Title },
            { "description", item.Body } ,
               { "filename",item.FileName },
               { "fileExtension",item.FileExtension },
               { "url",item.Url },
               { "iconUrl",item.IconUrl }
            }

         },
   };
await GraphHelper.AddOrUpdateItemAsync(connectionSettings.Id, extItem);
Show the Connector in the Portal
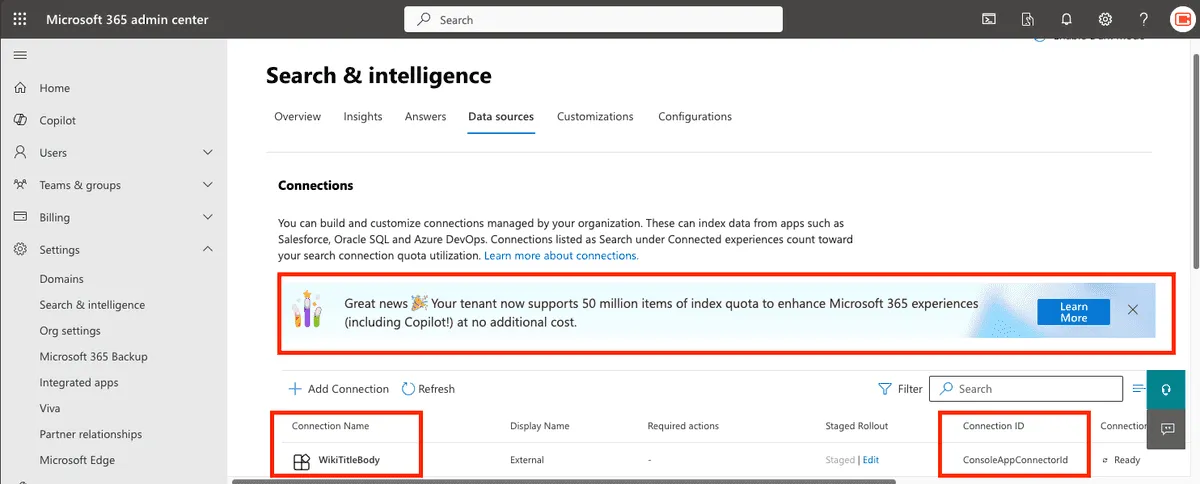
Previously, the item limitation was quite restrictive, with only a few thousand items included and 500 items per E5 licensed user. Now, with the new update, your tenant supports up to 50 million items of index quota at no additional cost. This is a significant enhancement, especially for integrating Microsoft 365 experiences, including Copilot!
Great news 🎉 Your tenant now supports 50 million items of index quota to enhance Microsoft 365 experiences (including Copilot!) at no additional cost.You can see your registration and connection name.
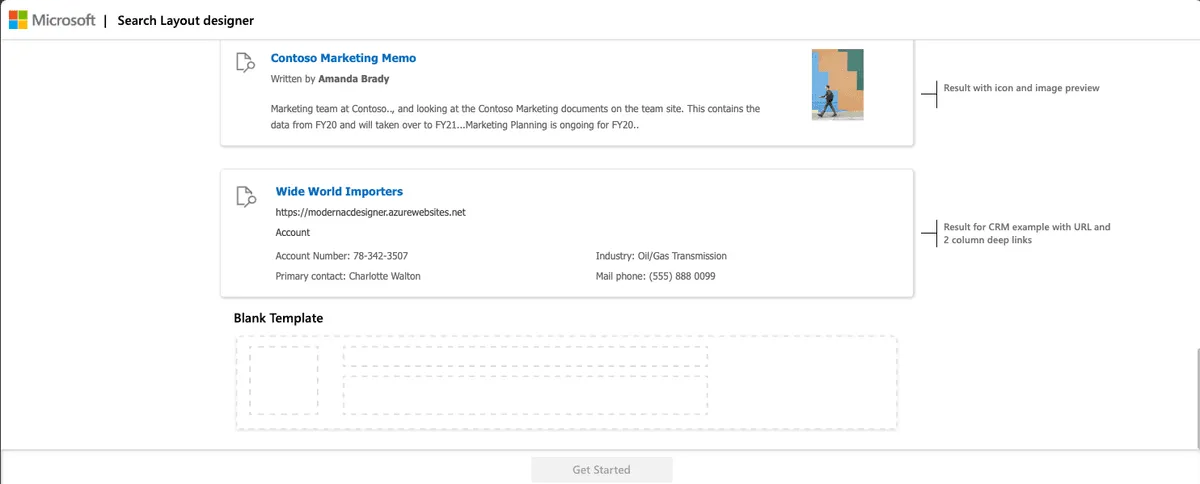
Customize the Result Type Layout
With a few clicks, you can change the layout of the search results.

You can use the Search Layout Designer to make these changes.
Output of Microsoft Copilot
On the bottom left side, you can see the link to the external item.
Remark
The Christkind marveled at how straightforward it was to integrate the items into M365 Search and Copilot. It wondered why this hadn’t been done sooner.
Links
- 1: The Challenge of the Letters
- 2: The Christkind’s Data Transformation - Transforming Letters into Forms
- 3: The Christkind’s Magical Email Solution
- 4: The Christkind’s Magical PWA - Transforming Children’s Letters into Digital Art
- 5: The Christkind’s Ingenious Snail Mail Solution - Bringing Letters to Life
- 6: The Christkind’s Ingenious Snail Mail Solution - Embracing the Flow
- 7: The Christkind’s Ingenious Snail Mail Solution - To the next level
- 8: The Christkind’s - Deployment Dilemma
- 9: The Christkind’s - Spreading the Christmas Spirit
- 10: The Christkind’s - Upgrading the Production Line PowerApps
- 11: The Christkind’s - Upgrading the Production Line Excel
- 12: The Christkind’s - The Christkind’s - Documenting the Christkind’s Journey
- 13 - The Christkind’s - The preparation for the call with Santa
- 14 - The Christkind’s - The Meeting with Santa